Why Accurate 12-Lead Placement Matters
A 12-lead ECG records electrical activity from 12 different perspectives using 10 electrodes. These leads allow clinicians to evaluate cardiac rhythm, conduction, chamber enlargement, ischemia, and infarction.
Because each lead offers a unique view of the heart's electrical activity, standardization is vital. Even small placement deviations can lead to:
- Axis shifts that mimic pathologies
- Altered R-wave progression suggesting infarction
- Pseudo-infarct patterns (e.g., false anterior STEMI)
- Masking of real ischemic changes
For institutions committed to patient safety, ensuring all staff know and follow correct placement is non-negotiable.
Understanding the 12 Leads: A Clinical Overview
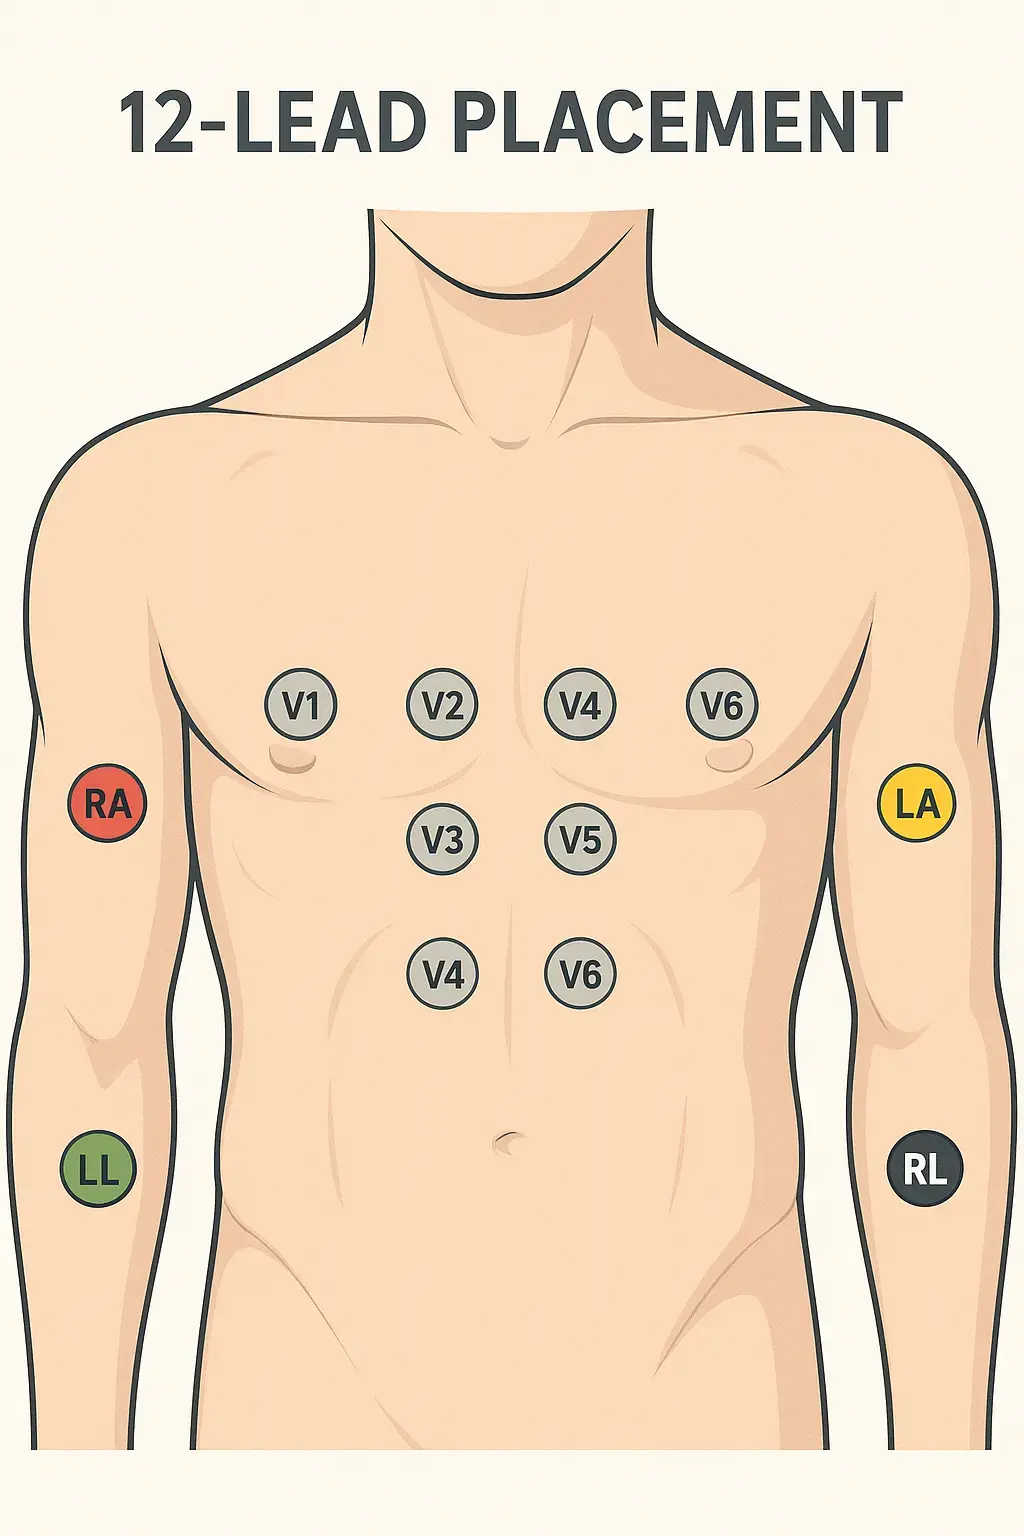
The 12-lead ECG consists of:
- 4 limb electrodes: RA, LA, RL, LL
- 6 precordial (chest) electrodes: V1–V6
Limb leads create six views of the heart's electrical activity in the frontal plane:
- Leads I, II, III (bipolar)
- aVR, aVL, aVF (augmented)
Precordial leads (V1–V6) provide horizontal plane views, assessing anterior, lateral, and septal regions.
This comprehensive perspective is why the 12-lead ECG is the gold standard for detecting ischemic changes.
Limb Lead Placement: The Foundation
Correct limb lead placement may seem simple but is often done incorrectly. It forms the basis for the frontal plane axis and needs consistency.
- RA (Right Arm): Between shoulder and wrist on the right arm.
- LA (Left Arm): Same on the left arm.
- RL (Right Leg): Anywhere on the right leg or lower torso. Serves as the ground electrode.
- LL (Left Leg): Left leg or lower torso.
Best Practice: Place limb electrodes distally (forearms and calves) for diagnostic ECGs. For monitoring (e.g., ICU), torso placements may be acceptable—but always document the modification.
Clinical Tip: Ensure skin is dry and free from lotions. Shave if necessary to improve adhesion.
Precordial Lead Placement: Step-by-Step Guide
Chest leads are the most error-prone. Here's how to place them accurately:
V1 and V2
- Locate the sternal angle (Angle of Louis) to find the 2nd rib.
- Count down to the 4th intercostal space.
- V1: Right sternal border.
- V2: Left sternal border.
Pitfall to Avoid: Placing V1 and V2 too high (3rd ICS) or too low (5th ICS) alters septal waveforms.
V3
- Place midway between V2 and V4.
- Don't guess; measure carefully.
Clinical Insight: V3 is critical for seeing anterior changes. Incorrect placement can obscure ST elevation.
V4
- 5th intercostal space at the midclavicular line.
- Palpate the clavicle and ensure alignment.
Tip: Watch for breast tissue—move as needed to ensure direct chest wall contact.
V5
- Horizontally level with V4.
- Anterior axillary line.
Common Error: Placing too anterior or posterior—compromises lateral lead views.
V6
- Same level as V4 and V5.
- Midaxillary line.
Pro Tip: Check horizontal alignment. A crooked line across V4–V6 distorts interpretation.
Skin Preparation: Reducing Artifacts
- Clean the skin with alcohol wipes.
- Remove oils, sweat, or lotions.
- Shave hair if needed.
- Let alcohol dry before electrode placement.
- Use fresh, quality electrodes.
Securing Cables: Loop and tape cables to reduce movement artifacts, especially in restless or transported patients.
Special Populations: Adjusting Technique
Pediatric Patients
- Use pediatric electrodes.
- Adapt spacing for smaller chest size but maintain anatomical correctness.
- Consider limb lead placement carefully—limbs are proportionally shorter.
Obese Patients
- Palpate carefully to find the sternal angle.
- Mark ICS levels if needed.
- Don't place electrodes on skin folds.
Respect and Dignity: Always explain what you're doing and maintain privacy.
Female Patients
- Move breast tissue to place V3–V6 on the chest wall.
- Offer a gown or drape for modesty.
- Communicate clearly with the patient to ensure comfort and trust.
Avoiding Common Errors
- Miscounting intercostal spaces.
- Swapping RA and LA electrodes.
- Skipping skin prep leading to poor adhesion.
- Placing chest leads diagonally instead of horizontally.
- Using old or dried-out electrodes.
- Neglecting to document modified placements.
Enhancing Diagnostic Quality
Proper electrode placement is more than protocol—it's essential patient safety. An accurate 12-lead ECG reduces misdiagnosis, avoids unnecessary testing, and improves clinical decision-making.
Healthcare facilities should consider routine training, skills check-offs, and periodic audits to maintain high standards.
Medten's Commitment to Quality Accessories
At Medten, we know that high-quality accessories support high-quality care. Our compatible ECG cables and leadwires are rigorously tested to ensure reliable signal quality, durability, and cost-effectiveness—helping facilities maintain best practices without exceeding budgets.
Explore Our Compatible ECG Accessories Here
Frequently Asked Questions (FAQ)
Q: Can I place limb electrodes on the torso in emergencies?
A: Yes, for monitoring, but document the modification. For diagnostic 12-leads (e.g., chest pain), distal limb placement is standard.
Q: What happens if leads are misplaced?
A: You can get axis shifts, false ST elevations/depressions, and other waveform changes that mimic or hide pathology.
Q: How often should electrodes be replaced?
A: Single-use electrodes should not be reused. For reusable types, follow manufacturer guidelines for cleaning and lifespan.
Disclaimer
This content is provided for informational purposes only and does not constitute medical advice. Always follow your institution's protocols and manufacturer guidelines.
Related Articles